 What is the ZO Blue Peel really like?
The ZO® Controlled Depth Peel™ or “Blue Peel” is a completely transformative experience for your skin. If you had one Blue Peel every year for the rest of your life, you’d never need a facelift! Our newest addition to the team, Patient Coordinator Jenny, recently tried a Blue Peel for the first time! Jenny’s Blue Peel experience is a great way to explore what you can expect, how to prepare, and why this could be a treatment worth trying yourself.
Tell us about your skin- what made you want a Blue Peel?
I was excited for the peel because I understood that it would resurface my skin and I was looking forward to the results! I thought my skin looked okay as someone who’s about to turn 42. Over the course of my adult life I’ve mainly just used drugstore products and hadn’t really done any treatments before. I thought it would be beneficial to start off with a good foundation for my skin before I transition to using professional products and makeup.
What was your consultation process like?
My experience was a bit different since I was involved in Blue Peel training for the team, with our rep from ZO Skin Health- who was very informative! During the consultation they assessed my skin; I had a lot of sun damage around my hairline area, and the left side of my face had more sun damage than the right. During this process, I learned a lot about my skin, what to expect during the Blue Peel treatment, how it would feel, the recovery process, and what results I could look forward to.
Have you ever had a blue peel before?
No. And you know what? I should have had one a long time ago. It was a game-changer.
What did the preparation process for the treatment involve?
Again, my situation was a little different than the average patient’s. Most patients will know in advance and have time to prepare their skin for 4-6 weeks (this also helps maximize results and comfort). In my case, I jumped right into the treatment. Because of this, I had more shedding and realized how valuable prepping your skin really is prior to the treatment.
Can you tell us a bit about the experience? Walk us through the steps of the blue peel.
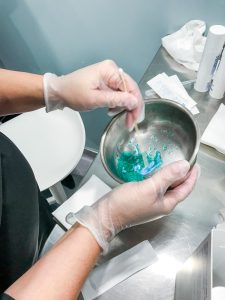
Oh my gosh- it was amazing! Overall, it was very relaxing. First, Sarah (our Medical Aesthetician) washed my face and the product she used smelled so yummy.
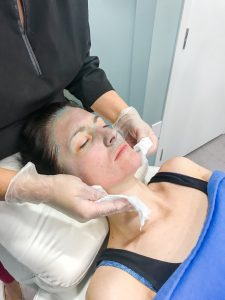
The first step of the Blue Peel application starts around the more sensitive areas using a cotton tip applicator. Sarah started at the outer corner of my eye and moved in towards my nose. After Sarah applied the peel to both of the eye areas, she continued along my lower lashes and into the eyebrow area (this was possible because I don’t have tattooed eyebrows). The rest of my eyelid area wasn’t covered.
After doing both eyebrows, she used a gauze applicator to do larger motions starting on the right side. Once the application was over, she used the nice smelling facial wash to clean off the Blue Peel. It was an awesome experience.
How did it feel during the peel? How uncomfortable were you?
The first areas -around the eye and more sensitive parts- burn a little more than other areas. The burning I felt here was very temporary. By the time they completed the application around the eye area, the burning sensation had stopped; it only stayed for a few minutes. I would say it was a 6 or 7 out of 10 on the pain scale. When she applied the product to my face moving right to left, it burned more on the left side of my face. I was informed this would be the case; we all have more sun damage on our left side since it’s the driver’s side and it’s subject to more sun exposure. The process overall was relaxing. Sarah was very calming and reassured me- checking in with me many times during the process to see how I was doing.
Overall the peel left a burning sensation at initial application but it cooled really quickly, within 3 or 4 minutes. My skin was red at the end- it looked like I had exfoliated my skin. It wasn’t burning, and it wasn’t hot, it was just red. There was the opportunity to use the cooling machine to blow some cool air at my face at the time of treatment. I declined as I didn’t feel that it was unbearable.
 How long was the treatment?
It took about 20-30 minutes for the whole process to happen- from the facewash prep to the final application and wash-off. The eye area took the longest, as it’s the most intricate and delicate. The longer strokes around the face were easier. They also did an additional feathering treatment just outside the jawline so the peel wouldn’t leave a defined mark across my jawline.
Tell us about aftercare.
ZO provided me with some Hydrating Créme for aftercare and that was glorious. Following the treatment and before I left for the day, Sarah said I could apply a pea-sized amount onto my face. I remember my skin feeling so tight, like I had basically spread Elmer’s glue all over my face and let it dry; that’s the best description I can think of! Once I applied the ZO Hydrating Crème to my face, my skin instantly soaked it up. It felt so soothing.
How long was it before you felt comfortable in public?
My case isn’t typical because I didn’t prepare my skin for 4-6 weeks. I feel like patients who are respecting that process would be shedding their skin slowly over the course of time. Because I had the Blue Peel without prep, my skin shed like a snake afterwards!
My treatment was done on a Friday and I went back to work on Monday with definite peeling. I would say by day 3 and 4 after treatment was when I had the worst amount of peeling. Sarah showed me how to trim my skin (!) with scissors, to avoid loose skin on my face and to help prevent any tearing. I was good about not touching or picking at my skin. When I trimmed my shedding skin I did it very close to my face surface- I think that also allowed the hydrating, healing product to directly nourish my skin.
Because of the industry I work in, I didn’t feel embarrassed about going to work. I was able to show patients firsthand what it looks like for your skin to shed, and as I was explaining this treatment on a weekly basis, it gave patients a chance to see what it was really like.
Anything else you’d like to share with us about this experience?
Now that I’ve had this experience myself, I have a greater understanding of the process that patients will go through. Now I can speak to that on a firsthand basis which I think is extremely beneficial. The intraoperative Blue Peel which we also offer is even more invasive and transformative than the Blue Peel I experienced. If my results are this incredible, imagine the results with an intraoperative blue peel.
During our training, the specialists also showed us a technique using feathering and flipping during an intraoperative Blue Peel. This technique almost acts as a forehead or brow lift! Our OR nurses Ange and Patti learned to use this technique for superior application and results.
Thanks for reading along!
I’m so grateful I was able to experience the ZO Blue Peel. Feel free to ask me any questions next time you visit us at the Cosmetic Surgery Clinic.
Ready to try a Blue Peel for yourself?
Book a consultation today and begin a journey to radiant, youthful skin.